Help!

RobMeade

Bronze Level Poster
Hi all,

So, I'm hoping someone may be able to advise.

I have a Octane Series: 17.3" Matte Full HD 144Hz 72% NTSC LED Widescreen (1920x1080) + G-Sync, ordered from PC Specialist in 2020.

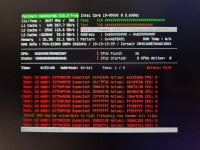
For the last few days I've been starting to get some BSOD.. ran a Windows Memory Diagnostics check earlier and it advised that there was a hardware problem.

Installed some other somewhere, MemSomething86 I think it was called (can't check as laptop currently screwed). That also reported lots of errors (it gave up after reaching 10000).

I have 2 memory sticks in the laptop, but I didn't know which one, or whether both, were faulty.

I figured if I opened it up, took one out, ran the test again, and then swap them Iver and repeat, I might be able to establish which stick was problematic.

Opening the back of the laptop inbound RAM3 and RAM4 slots, but no RAM1 and RAM2 slots.

I removed some more screws and eventually found them to be on the flip side, effectively directly under the keyboard. I was able to remove one.

And now for the problem.

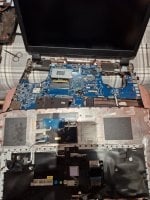
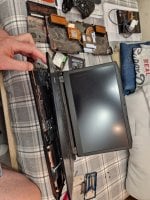
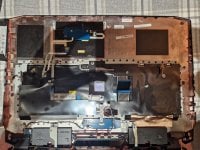
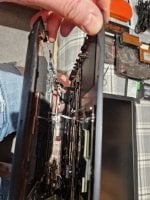
There are about 6 SHORT cables that attach the upper part of the frame (with the keyboard) to the bottom part of the frame, connecting to the motherboard. These are very short cables and I cannot for the life of me see how, when holding the two pieces together I can get my hand between to reattach them. I can't imagine how anyone did in the first place.

So, I was wondering if anyone else has done something similar and has any advice for getting it back together. I needed the laptop for a meeting tomorrow which is now screwed, but I tend to use this every day for my entire life, work, leisure, everything, so it's quite important/urgent.

I am considering sending it back to PC Specialist, despite the warranty running out in Feb, but hoping to avoid a lengthy turn around if it's something I can resolve myself.

Any suggestions would be gratefully received.
 

SpyderTracks

We love you Ukraine
Hi all,

So, I'm hoping someone may be able to advise.

For the last few days I've been starting to get some BSOD.. ran a Windows Memory Diagnostics check earlier and it advised that there was a hardware problem.

Installed some other somewhere, MemSomething86 I think it was called (can't check as laptop currently screwed). That also reported lots of errors (it gave up after reaching 10000).

I have 2 memory sticks in the laptop, but I didn't know which one, or whether both, were faulty.

I figured if I opened it up, took one out, ran the test again, and then swap them Iver and repeat, I might be able to establish which stick was problematic.

Opening the back of the laptop inbound RAM3 and RAM4 slots, but no RAM1 and RAM2 slots.

I removed some more screws and eventually found them to be on the flip side, effectively directly under the keyboard. I was able to remove one.

And now for the problem.

There are about 6 SHORT cables that attach the upper part of the frame (with the keyboard) to the bottom part of the frame, connecting to the motherboard. These are very short cables and I cannot for the life of me see how, when holding the two pieces together I can get my hand between to reattach them. I can't imagine how anyone did in the first place.

So, I was wondering if anyone else has done something similar and has any advice for getting it back together. I needed the laptop for a meeting tomorrow which is now screwed, but I tend to use this every day for my entire life, work, leisure, everything, so it's quite important/urgent.

I am considering sending it back to PC Specialist, despite the warranty running out in Feb, but hoping to avoid a lengthy turn around if it's something I can resolve myself.

Any suggestions would be gratefully received.
It sounds like you've removed from the underside through to the keyboard?

Normally you would unscrew the bottom to access those components, and then flip it over and remove the keyboard to reach the other layer. I think you've removed the motherboard portion which you don't want to do?

Can you upload a photo?
 

RobMeade

Bronze Level Poster
Hi,

Thanks for such a prompt reply!

I was going to attach photos, but the forum said they were too large, and I'm struggling to find a way to resize them on my mobile (no laptop!), I will see if there's a way to do that and then upload them.

To describe the process, I started by opening the battery capartment, removed the battery.

Then onscreen the drive bays, removed those.

Then all of the screws around the edge of the case, it came apart as two separate pieces.

This was when I could Then see the gap where RAM3 and 4 would go. Unscrewed both fans, cleaned one, couldn't get to the other as plugged in in between to cards on the motherboard.

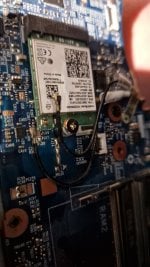
Guess that the RAM1 and 2 must be on the other side of the motherboard, so then unscrewed more screws around rhe edge and through the centre which enabled me to lift the upper/keyboard part of the frame away slightly, as I did I could see the cables were short. I could reach a brown one which I believe is the keyboard cable and managed to unplug that, the others popped out as I was moving the upper/keyboard part of the frame (they aren't broken, just need clipping in). Two small cables were only making contact with another smaller Intel circuit board by tape, which surprised me.

I will see if I can resize the images, nonidea why the phone doesn't seem to have this as default!
 

SpyderTracks

We love you Ukraine
Then all of the screws around the edge of the case, it came apart as two separate pieces.
Yes, you've removed the motherboard, you don't want to do that, that needs to remain in place.

To access the secondary RAM slots, you remove the keyboard from the top.


If you're using an android phone, just go to edit the picture, then one of the options is resize, reduce to 40%

If on Apple, then you'll need a program to do it like ImageSize: https://apps.apple.com/us/app/image-size/id670766542
 

RobMeade

Bronze Level Poster
There didn't appear to be anyway of removing the keyboard from the top though, all the screws were on the bottom of the laptop, or internal etc?

I've resized the images on my phone, will see if I can pop them up.
 

Attachments

  • 20230405_215808.jpg
    20230405_215808.jpg
    528.2 KB · Views: 85
  • 20230405_215827.jpg
    20230405_215827.jpg
    642.8 KB · Views: 95
  • 20230405_215851.jpg
    20230405_215851.jpg
    346.3 KB · Views: 93
  • 20230405_215911.jpg
    20230405_215911.jpg
    601.9 KB · Views: 94
  • 20230405_215927.jpg
    20230405_215927.jpg
    794.6 KB · Views: 92

SpyderTracks

We love you Ukraine
There didn't appear to be anyway of removing the keyboard from the top though, all the screws were on the bottom of the laptop, or internal etc?

I've resized the images on my phone, will see if I can pop them up.
Yes, screws for the motherboard are on the bottom usually marked as such, you remove those, then use a large pin or micro screw driver in the keyboard release hole which is usually also on the underside.
 

RobMeade

Bronze Level Poster
Oooh, so if I can find that, I could pop that actual keyboard out of the upper frame and then be able to maybe reattach these cables?

Any idea where that keyboard release is from this photo?
 

Attachments

  • 20230405_220849.jpg
    20230405_220849.jpg
    733.6 KB · Views: 85

SpyderTracks

We love you Ukraine
Oooh, so if I can find that, I could pop that actual keyboard out of the upper frame and then be able to maybe reattach these cables?

Any idea where that keyboard release is from this photo?
You'd need to look from the external side of the bottom cover, you access it all from the outside.

Can you also post the Clevo model number which should be on a label on the underside?
 

RobMeade

Bronze Level Poster
Hmm, but the upper frame and keyboard is completely detached already, loose in my hand etc.

To clarify, when you say "keyboard", are you referring to literally the keys, or, the upper part of the frame which those keys sit inside? Just wanna check we aren't talking about different things etc.

The Clevo model number is : P775TM1

Really appreciate your help btw, thank you. Was really feeling utterly hopeless when I posted. 😞
 
Last edited by a moderator:

SpyderTracks

We love you Ukraine
Hmm, but the upper frame and keyboard is completely detached already, loose in my hand etc.
Yes, but that's the chassis, the keyboard is it's own unit that detaches separately from the frame, you don't need to dismantle the frame (and definitely shouldn't, you run the risk of tearing those interconnects.

All you have to do is unscrew the relevant keyboard screws from the underside, you don't even have to remove the cover, then just poke a micro screwdriver through the keyboard release hole, then the keyboard just slides out.

Page 39 in this manual: https://www.e-weekly.co.uk/download/RnD/DRIVERS/CLEVO/P775TM1/ESM.pdf
 

RobMeade

Bronze Level Poster
Found a video online showing how to remove the keyboard out of the frame, ousting in the little key tabs as he referred to them as, I now have the keyboard out of the frame! Progress!
 

SpyderTracks

We love you Ukraine
Found a video online showing how to remove the keyboard out of the frame, ousting in the little key tabs as he referred to them as, I now have the keyboard out of the frame! Progress!
Awesome, well done, do put the chassis all back together, those interconnects are extremely fragile and tear easily.
 

RobMeade

Bronze Level Poster
Oops, posts overlapped, sorry, using phone on its not auto refreshing.

Thanks for the link, I'll check it out in a sec. With the keyboard out I cam now see that those cables are sooo much easier to reattach, and that accessing the two ram slots would have been much easier.

I did see there were specific screws marked KB on the inside etc. I didn't know that the keyboard popped out from the top of the laptop though, that's soo helpful, as a) I wanted to clean it and b) was considering ordering a replacement but wasn't sure how to install it, which I now know.

I'm going to put it all back together and see what happens, just hoping I've not broken anything!

I will update you in due course but again, I cannot thank you enough for spending your time to help me, I appreciate it enormously. This was a big investment a couple of years ago and literally thought it was a write off earlier.
 

SpyderTracks

We love you Ukraine
Oops, posts overlapped, sorry, using phone on its not auto refreshing.

Thanks for the link, I'll check it out in a sec. With the keyboard out I cam now see that those cables are sooo much easier to reattach, and that accessing the two ram slots would have been much easier.

I did see there were specific screws marked KB on the inside etc. I didn't know that the keyboard popped out from the top of the laptop though, that's soo helpful, as a) I wanted to clean it and b) was considering ordering a replacement but wasn't sure how to install it, which I now know.

I'm going to put it all back together and see what happens, just hoping I've not broken anything!

I will update you in due course but again, I cannot thank you enough for spending your time to help me, I appreciate it enormously. This was a big investment a couple of years ago and literally thought it was a write off earlier.
No problem.

For future note, most laptop are designed this way, certainly Clevo's.

The TongFang models tend to have keyboards that are actually part of the chassis, so you have to return the whole laptop and get the actual top part of the chassis replaced which in my mind is just criminal.

Clevo's have been much better and stuck with modular keyboards, and the keys tend to be of much higher quality.

So if there ever is an issue specifically related to the keyboard, like keys not pressing correctly, or key caps coming off, you can just buy a replacement keyboard through the spare parts section of your account, and fit it in the way you're doing now. It's so much better.
 

RobMeade

Bronze Level Poster
I'm popping the last few screws in as we speak, and yeah, ironically, despite all of my earlier stress, upset, and panic, with your help I've actually learnt a lot about my laptop. The manual you linked to is a blessing also, surprised it didn't just come with that! Sooo useful.

Honestly, words cannot express how grateful I am for your help. I'm slightly apprehensive about turning it on now incase it goes boom, but hopefully not.

REALLY appreciate all of your help and support. :)
 

SpyderTracks

We love you Ukraine
I'm popping the last few screws in as we speak, and yeah, ironically, despite all of my earlier stress, upset, and panic, with your help I've actually learnt a lot about my laptop. The manual you linked to is a blessing also, surprised it didn't just come with that! Sooo useful.

Honestly, words cannot express how grateful I am for your help. I'm slightly apprehensive about turning it on now incase it goes boom, but hopefully not.

REALLY appreciate all of your help and support. :)
Pleasure, glad to have helped (y)
 

RobMeade

Bronze Level Poster
All back together, although I've not clipped the keyboard back in properly as I might need to get to the other ram stick.

Currently running another memory diagnostic on the one memory stick I left in.

Minor issues so far, keyboard not working at all.

No WiFi networks detected. Wondering if that was the small circuit board I mentioned had the two wires connected with tape.

Not sure why the keyboard isn't working, unless it's clever enough to know its not fitted properly. There were a series of magnets under the key pad area, just assumed that was to hold it in place.

One of the ribbon cables for the keyboard was also surprisingly difficult to get in, so maybe I've not quite got it in properly. Will wait for the memory test to complete and check it again.

Fans sound better since cleaning them. Will probably get some more heat sink paste stuff too, that was looking like it could do with replacing. Just hope I've not broken anything!
 

RobMeade

Bronze Level Poster
Hey, thanks for the reply.

They didn't seem to pop on, looked like the cables have a little divet in the end, and the ircuit board pins are slightly raised, like they should attach, but they wouldn't stay connected in their own.

I also wasn't sure which was round they needed to go after all the excitement earlier.

The circuit board has little icons next to the pins, but both cables are black. Around each cable is a little cut off piece of tubing, one is clear, one is white. I "guessed" that the one with the white should be attached the the pin with the white icon. And the other other to the black ironed pin. Guess it's either screwed, or they are around the wrong way, or maybe the tape just isn't holding them on well enough. Deffo didn't seem to be push-fit though.

First memory test has been successful so going to swap the memory sticks over and try the second now.

Hopefully that one will report errors and I'll know which to replace.

Hopefully I can resolve the keyboard and WiFi not working too. Sigh.
 

SpyderTracks

We love you Ukraine
Hey, thanks for the reply.

They didn't seem to pop on, looked like the cables have a little divet in the end, and the ircuit board pins are slightly raised, like they should attach, but they wouldn't stay connected in their own.

I also wasn't sure which was round they needed to go after all the excitement earlier.

The circuit board has little icons next to the pins, but both cables are black. Around each cable is a little cut off piece of tubing, one is clear, one is white. I "guessed" that the one with the white should be attached the the pin with the white icon. And the other other to the black ironed pin. Guess it's either screwed, or they are around the wrong way, or maybe the tape just isn't holding them on well enough. Deffo didn't seem to be push-fit though.

First memory test has been successful so going to swap the memory sticks over and try the second now.

Hopefully that one will report errors and I'll know which to replace.

Hopefully I can resolve the keyboard and WiFi not working too. Sigh.
They pop on like clothes poppers, but they're extremely fiddly to get on, they have to be absolutely horizontal before applying pressure to fit

1680737851004.png
 

RobMeade

Bronze Level Poster
Managed to attach them, needed a bit more force that'll I expected but they are on. That manual suggested the white housed cable was for antenna two, so guessing the clear one is for antenna one. That how I have them now, opposite room last time, so will be interesting to see if they work.

Just trying to reattach the keyboard having swapped the ram sticks. I really hope it works this time!
 
Top